
Imagine your WooCommerce product showing up in Google search results with star ratings, price, and stock status — all without the user even clicking your link. That’s the power of Product Schema Markup.
Schema markup (also called structured data) is a type of code you add to your WooCommerce store that tells search engines exactly what your page contains. Google uses this data to generate rich snippets — visually enhanced search results that stand out from the crowd and consistently earn higher click-through rates (CTR).
In this step-by-step guide, you’ll learn:
- What product schema markup is and why it matters for WooCommerce SEO
- How Google uses it to display rich results
- 3 proven methods to add it to your store (plugin, manual code, and Google Tag Manager)
- How to test and validate your schema
- Common mistakes to avoid
By the end, your WooCommerce products will be fully equipped to appear as rich snippets in Google Search.
What Is Product Schema Markup?
Schema markup is structured data written in JSON-LD format (JavaScript Object Notation for Linked Data) that lives in the <head> of your webpage. It uses a standardized vocabulary from Schema.org to label your content so search engines can interpret it without guessing.
For WooCommerce, the most important schema type is Product, which tells Google:
- The product name and description
- The price and currency
- Availability (in stock / out of stock)
- Review ratings (star ratings in search results)
- Brand, SKU, and GTIN identifiers
- Images
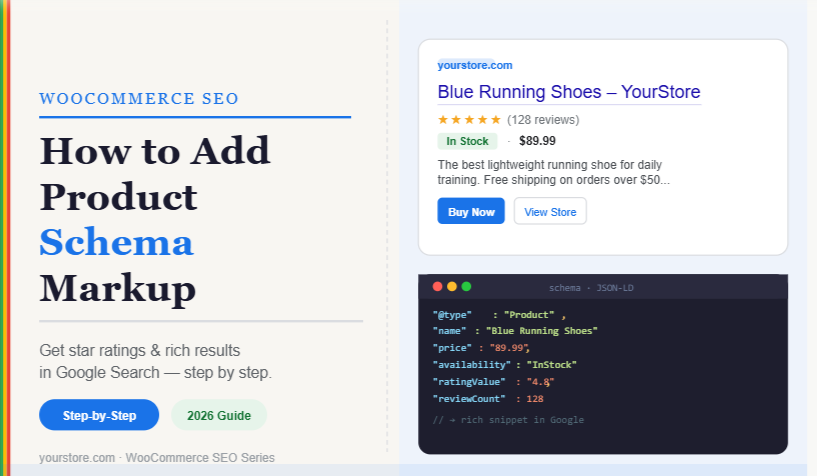
What a Rich Snippet Looks Like
When schema is correctly implemented, your product listing in Google can look like this:
🛒 Blue Running Shoes — YourStore.com
⭐⭐⭐⭐½ (128 reviews) · $89.99 · In Stock
The best lightweight running shoe for daily training...
Compared to a standard blue link, this rich result is far more compelling and drives significantly more clicks.
Why Product Schema Markup Matters for WooCommerce SEO
1. Higher Click-Through Rates
Rich snippets with star ratings and price earn 20–30% more clicks than standard results, according to SEO studies. More clicks signal relevance to Google, which can improve your ranking further.
2. Better Product Visibility
Price and availability shown directly in search results mean buyers can qualify your product before visiting — bringing in more purchase-ready visitors.
3. Eligibility for Google Shopping Features
Proper schema markup makes your products eligible for Google’s free product listings in the Shopping tab.
4. Voice Search Optimization
Voice assistants use structured data to answer shopping queries like “Where can I buy blue running shoes under $100?”
5. Competitive Edge
Most small WooCommerce stores don’t implement schema correctly. Doing so puts you visually ahead of competitors in search results.
Before You Start: Prerequisites
Before implementing schema markup, make sure you have:
- ✅ A live WooCommerce store (version 7.0+)
- ✅ Admin access to your WordPress dashboard
- ✅ Products with complete data: title, description, price, images, and reviews
- ✅ A Google Search Console account (for testing)
- ✅ (Recommended) A staging site to test changes first
Method 1: Add Schema Markup via an SEO Plugin (Recommended for Beginners)
This is the easiest and most reliable method. Plugins like Rank Math, Yoast SEO, and AIOSEO automatically generate Product Schema from your WooCommerce product data.
Using Rank Math (Best for WooCommerce)
1: Install Rank Math
- Go to WordPress Dashboard → Plugins → Add New
- Search for “Rank Math SEO”
- Click Install Now, then Activate
2: Run the Setup Wizard
- Go to Rank Math → Dashboard → Setup Wizard
- Connect your Google account when prompted
- Select Advanced Mode for full schema control
3: Enable WooCommerce Schema
- Navigate to Rank Math → Titles & Meta → Products
- Scroll to the Schema section
- Set Schema Type to
Product - Enable these options:
- ✅ Product Name
- ✅ Product Description
- ✅ Price
- ✅ Availability
- ✅ Review Rating
- ✅ Brand
- ✅ SKU / GTIN
4: Configure Global Product Settings
Schema Type:     Product
Product Name:    %title%
Description:     %wc_shortdesc%
Price:           Auto (from WooCommerce)
Availability:    Auto (from stock status)
Rating:          Auto (from WooCommerce reviews)
5: Save and Test
Click Save Changes. Then visit any product page and view source (Ctrl+U) to confirm a <script type="application/ld+json"> block appears in the <head>.
Using Yoast SEO + WooCommerce SEO Add-on
If you’re already using Yoast:
- Install the Yoast WooCommerce SEO plugin (paid, ~$79/year)
- Go to Yoast SEO → Yoast WooCommerce SEO
- Enable Product Schema in the Schema tab
- Map fields: name, description, price, reviews
Method 2: Add Schema Markup Manually with PHP (For Developers)
If you prefer a plugin-free approach, you can output JSON-LD schema directly from your theme’s functions.php or a custom plugin.
Step 1: Create the Schema Output Function
Add this to your theme’s functions.php or a code snippets plugin:
add_action( 'wp_head', 'add_woocommerce_product_schema' );

function add_woocommerce_product_schema() {
    if ( ! is_singular( 'product' ) ) {
        return;
    }

    global $post;
    $product = wc_get_product( $post->ID );

    if ( ! $product ) {
        return;
    }

    // Get price info
    $price         = $product->get_price();
    $currency      = get_woocommerce_currency();
    $availability  = $product->is_in_stock() ? 'https://schema.org/InStock' : 'https://schema.org/OutOfStock';

    // Get review data
    $rating_count  = $product->get_rating_count();
    $average_rating = $product->get_average_rating();

    // Build image array
    $image_id   = $product->get_image_id();
    $image_url  = wp_get_attachment_url( $image_id );

    // Build schema array
    $schema = array(
        '@context'    => 'https://schema.org/',
        '@type'       => 'Product',
        'name'        => $product->get_name(),
        'description' => wp_strip_all_tags( $product->get_short_description() ),
        'image'       => $image_url,
        'sku'         => $product->get_sku(),
        'brand'       => array(
            '@type' => 'Brand',
            'name'  => get_bloginfo( 'name' ),
        ),
        'offers'      => array(
            '@type'         => 'Offer',
            'url'           => get_permalink(),
            'priceCurrency' => $currency,
            'price'         => $price,
            'availability'  => $availability,
            'seller'        => array(
                '@type' => 'Organization',
                'name'  => get_bloginfo( 'name' ),
            ),
        ),
    );

    // Add review aggregate if ratings exist
    if ( $rating_count > 0 ) {
        $schema['aggregateRating'] = array(
            '@type'       => 'AggregateRating',
            'ratingValue' => $average_rating,
            'reviewCount' => $rating_count,
        );
    }

    // Output JSON-LD
    echo '<script type="application/ld+json">'
        . wp_json_encode( $schema, JSON_UNESCAPED_SLASHES | JSON_UNESCAPED_UNICODE )
        . '</script>' . "\n";
}
Step 2: Add GTIN / MPN (Optional but Recommended)
If your products have barcode or manufacturer data, extend the schema:
// Inside the $schema array, add:
'gtin13'  => get_post_meta( $post->ID, '_gtin', true ),
'mpn'     => get_post_meta( $post->ID, '_mpn', true ),
You’ll need to store these values in product custom fields with the keys _gtin and _mpn.
Step 3: Handle Variable Products
Variable products need schema for each variation. Add this extension:
if ( $product->is_type( 'variable' ) ) {
    $variations    = $product->get_available_variations();
    $prices        = array_column( $variations, 'display_price' );
    $min_price     = min( $prices );
    $max_price     = max( $prices );

    $schema['offers'] = array(
        '@type'         => 'AggregateOffer',
        'lowPrice'      => $min_price,
        'highPrice'     => $max_price,
        'priceCurrency' => $currency,
        'offerCount'    => count( $variations ),
    );
}
Method 3: Add Schema via Google Tag Manager (No-Code Option)
This method is useful if you have GTM already set up and want to manage schema without touching code.
Step 1: Set Up a GTM Tag
- Go to your Google Tag Manager container
- Click Tags → New
- Choose Custom HTML as the tag type
Step 2: Paste the JSON-LD Script
<script type="application/ld+json">
{
  "@context": "https://schema.org/",
  "@type": "Product",
  "name": "{{DL - Product Name}}",
  "description": "{{DL - Product Description}}",
  "image": "{{DL - Product Image URL}}",
  "offers": {
    "@type": "Offer",
    "priceCurrency": "USD",
    "price": "{{DL - Product Price}}",
    "availability": "https://schema.org/InStock"
  }
}
</script>
Step 3: Set the Trigger
- Set trigger to fire on Page URL contains
/product/ - This ensures schema only fires on WooCommerce product pages
Step 4: Push Data to the Data Layer
Add this snippet to your functions.php to push WooCommerce data into GTM’s dataLayer:
add_action( 'wp_footer', 'push_product_data_to_gtm' );
function push_product_data_to_gtm() {
    if ( ! is_singular( 'product' ) ) return;
    global $post;
    $product = wc_get_product( $post->ID );
    ?>
    <script>
    window.dataLayer = window.dataLayer || [];
    dataLayer.push({
        'DL - Product Name': '<?php echo esc_js( $product->get_name() ); ?>',
        'DL - Product Price': '<?php echo esc_js( $product->get_price() ); ?>',
        'DL - Product Description': '<?php echo esc_js( wp_strip_all_tags( $product->get_short_description() ) ); ?>',
        'DL - Product Image URL': '<?php echo esc_js( wp_get_attachment_url( $product->get_image_id() ) ); ?>'
    });
    </script>
    <?php
}
Step-by-Step: Testing Your Schema Markup
Once implemented, always validate your schema before considering it live.
Tool 1: Google Rich Results Test
- Go to search.google.com/test/rich-results
- Enter your product page URL
- Click Test URL
- Look for ✅ “Product” rich result detected
A successful result shows all detected fields: name, price, availability, and rating.
Tool 2: Schema Markup Validator
- Visit validator.schema.org
- Enter your URL or paste your JSON-LD directly
- Check for errors and warnings
- Fix any red errors (warnings are usually fine)
Tool 3: Google Search Console
After 48–72 hours of deploying schema:
- Go to Google Search Console → Enhancements → Products
- Check for any errors or coverage warnings
- Use Validate Fix once errors are resolved
Common Schema Markup Mistakes to Avoid
| ❌ Mistake | ✅ Fix |
|---|---|
Missing priceCurrency field | Always include the currency code (e.g. "USD") |
Using 0 as the price | Never use zero — Google may penalize or ignore it |
| Fake or inflated review counts | Only use real WooCommerce review data |
| Schema on non-product pages | Restrict to is_singular('product') only |
| Outdated price in schema | Let WooCommerce populate dynamically, not hardcoded |
Missing availability field | Always include InStock or OutOfStock |
| Duplicate schema blocks | Remove theme or old plugin schema if using a new method |
What Google Requires for Product Rich Results (2026 Guidelines)
Google’s latest requirements for Product schema eligibility:
- Required fields:
name,image,description,offers(withprice,priceCurrency,availability) - Strongly recommended:
aggregateRating,brand,sku,gtin - Prohibited: Fake reviews, misleading prices, unavailable products shown as in-stock
- New in 2026: Google now requires
shippingDetailsfor merchant-listed products in Shopping results
Adding Shipping Details (2026 Requirement)
// Add inside your $schema['offers'] array:
'shippingDetails' => array(
    '@type'           => 'OfferShippingDetails',
    'shippingRate'    => array(
        '@type'    => 'MonetaryAmount',
        'value'    => '4.99',
        'currency' => 'USD',
    ),
    'deliveryTime'    => array(
        '@type'           => 'ShippingDeliveryTime',
        'handlingTime'    => array(
            '@type'   => 'QuantitativeValue',
            'minValue'=> 0,
            'maxValue'=> 1,
            'unitCode'=> 'DAY',
        ),
        'transitTime'     => array(
            '@type'   => 'QuantitativeValue',
            'minValue'=> 3,
            'maxValue'=> 5,
            'unitCode'=> 'DAY',
        ),
    ),
),
How Long Until Rich Snippets Appear in Google?
After correctly implementing schema:
- Crawling: Google needs to re-crawl your product pages (1–7 days)
- Indexing: Schema data gets indexed within 1–2 weeks
- Rich result appearance: 2–6 weeks after indexing, depending on your site’s authority
Speed this up by:
- Submitting your sitemap in Google Search Console
- Using URL Inspection Tool → Request Indexing on key product pages
Final Thoughts
Adding Product Schema Markup to WooCommerce is one of the highest-ROI SEO tasks you can do for your store. It costs nothing beyond an hour of implementation time, yet its impact — star ratings, price display, and rich snippets in search results — can dramatically lift click-through rates and drive more qualified traffic.
Start with Method 1 (Rank Math) if you want a quick, reliable setup. Graduate to Method 2 (PHP) if you need full control over the schema output. Either way, validate with Google’s Rich Results Test and monitor Search Console for the next few weeks.